
Loading fishing line onto a reel sounds simple, but it’s a skill that separates smooth, frustration-free fishing from tangled headaches. Many anglers, especially beginners, struggle with line twists, loose spools, or even damaged gear because they missed a few key steps.
Properly spooling your reel helps you cast farther, reduces knots, and makes reeling in a catch much easier. This guide breaks down the process so anyone can master it, even if you’ve never touched a fishing rod before.
You’ll find clear steps for both spinning and baitcasting reels, the right tools and materials, and crucial tips often missed by first-timers. We’ll also cover how to choose the best line for your needs, explain common mistakes, and give you practical ways to prevent them.
Whether you’re gearing up for your first fishing trip or want to perfect your setup, this article will help you get your reel—and your fishing—off to a strong start.
Understanding The Basics: Fishing Line And Reel Types
Before you start loading your reel, you need to know what kind of reel and line you’re working with. Not all reels use the same method, and not all lines suit every kind of fishing.
Types Of Fishing Reels
There are three main types:
- Spinning reels – The most popular for beginners. Easy to use, sit under the rod.
- Baitcasting reels – Offer better control and longer casts, but need practice.
- Spincast reels – Simple, closed-face design. Good for kids or absolute beginners.
Each reel type has its own way of attaching and winding the line. If you don’t know your reel type, check the label or the manufacturer’s website.
Types Of Fishing Lines
There are three main kinds:
- Monofilament line – Stretches, forgiving, and cheap. Good for beginners.
- Braided line – Stronger, thinner, less stretch. Great for long casts or big fish.
- Fluorocarbon line – Nearly invisible in water, sinks faster, but stiffer.
Choosing the right line depends on your target fish, environment (freshwater or saltwater), and your reel’s limits. Most reels have a label showing the recommended line type and test strength (e. g. , “8 lb mono, 120 yards”).
Why Proper Loading Matters
A poorly spooled reel can cause:
- Line twist – Makes knots, weakens the line.
- Loose line – Reduces casting distance.
- Overfilling or underfilling – Can jam the reel or limit your casting.
Learning to load your reel the right way saves time and keeps your gear working well.
What You Need Before You Start
Gather these items for a smooth process:
- Your fishing reel (spinning or baitcasting)
- The rod (attaching the reel makes spooling easier)
- New fishing line (choose type and strength for your reel)
- Scissors or line clippers
- A pencil or rod to hold the line spool (helps with tension)
- A damp cloth (optional, for extra line tension)
- Backing line (optional, for braided line on spinning reels)
Double-check your reel’s manual for any special instructions. Some reels, especially older or specialty models, may have unique steps.

Credit: www.wikihow.com
Step-by-step: How To Load Fishing Line On A Spinning Reel
Spinning reels are the most common, so let’s start here. This process works for most modern spinning reels.
1. Attach The Reel To The Rod
Fasten your reel to the rod’s reel seat. This gives you control and keeps both hands free.
2. Open The Bail Arm
The bail is the wire arm that flips open and closed. Open it before tying the line.
3. Thread The Line Through The Guides
Start at the tip of the rod and feed the line through each guide (the loops on the rod). This makes sure the line winds evenly.
4. Tie The Line To The Spool
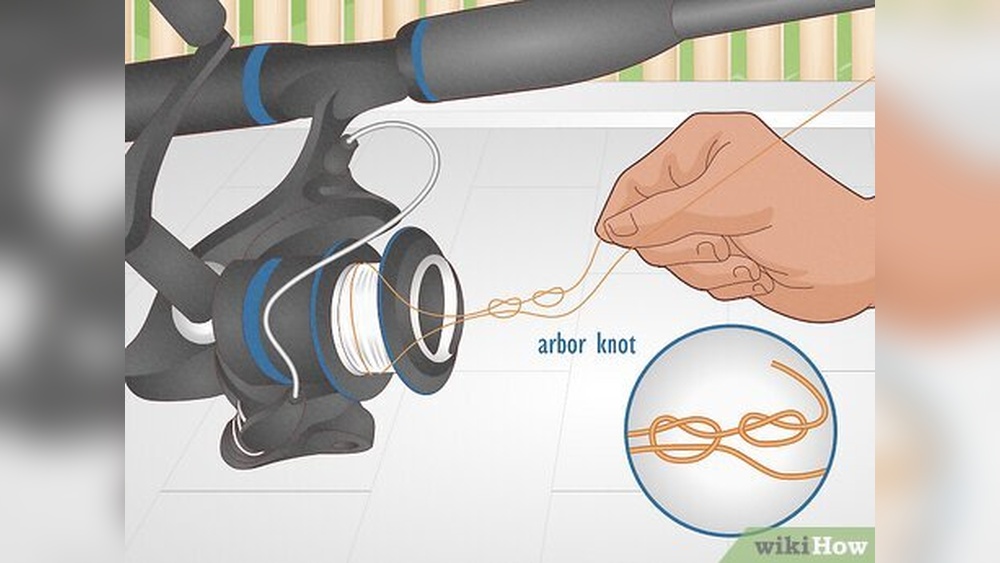
Use an arbor knot or improved clinch knot to attach the line to the spool. Trim any extra line close to the knot.
Example: Arbor Knot Steps
- Wrap the line around the spool.
- Tie an overhand knot around the mainline.
- Tie another overhand knot at the tag end.
- Pull both knots tight against the spool.
5. Close The Bail Arm
Flip the bail back to its normal position. This prepares the reel for winding.
6. Apply Tension To The Line
Hold the line between your fingers or use a damp cloth. This keeps the line tight and prevents loose loops.
7. Load The Line Onto The Spool
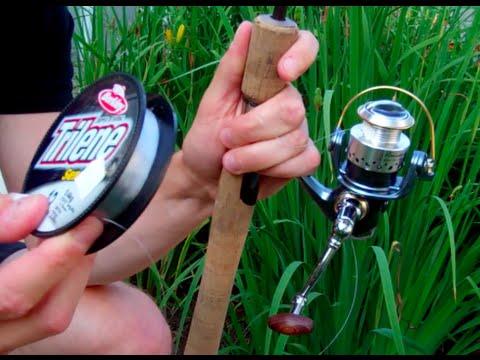
Ask a friend to hold the line spool with a pencil through the center, or place it flat on the floor. Make sure the line comes off the spool the same way it goes onto the reel (usually counterclockwise for spinning reels).
Turn the handle slowly, winding the line onto the reel. Keep tension steady.
8. Fill To The Correct Level
Stop when the line is about 1/8 inch below the spool’s rim. Overfilling can cause tangles, while underfilling reduces casting distance.
9. Cut The Line
Clip the line, leaving about 2 feet hanging. Tie on a lure or hook to stop the line from slipping back through the guides.
10. Check For Line Twist
After loading, let the line hang loose. If it coils, you may have line twist. Remove the twisted section and reload with more tension.
How To Load Fishing Line On A Baitcasting Reel
Baitcasting reels need more care to avoid line digging and backlash. Here’s how to do it right.
1. Attach The Reel To The Rod
Just like with spinning reels, this makes the process easier.
2. Thread The Line Through The Guides
Start at the tip, threading through each guide down to the reel.
3. Open The Reel’s Level Wind Guide
Baitcasters have a small hole (level wind). Thread the line through this before tying.
4. Tie The Line To The Spool
Use an arbor knot or uni knot. Trim any tag ends.
5. Apply Tension
Pinch the line between your fingers or use a cloth as you wind.
6. Load The Line Evenly
Have a friend hold the spool, or use a line spooler. The line should come off the filler spool straight, not spinning, to prevent twist.
Turn the handle slowly, making sure the line spreads evenly across the spool. Guide it with your finger if needed.
7. Fill To The Right Level
Stop when the line is 1/8 inch below the spool’s edge.
8. Cut And Secure The Line
Clip the line, leaving enough to tie a lure. Secure the line in the reel’s keeper or with a rubber band.
9. Check For Backlash
Turn the spool by hand. If the line digs into itself or feels loose, pull off a few yards and rewind with more tension.
Credit: www.youtube.com
Special Case: Loading Braided Line
Braided line is strong and thin but can slip on smooth spools. Here’s how to handle it:
- Add a monofilament backing: Wind on 10-20 yards of mono first, then tie the braid to it with an Albright knot.
- Use electrical tape: Place a strip on the spool before tying the braid. This stops slipping.
- Fill carefully: Braid has less stretch, so even more tension is needed when spooling.
How To Load Line On A Spincast Reel
Spincast reels are easy to use and often have a button on the back.
- Press the button to release the line.
- Remove the cover (unscrew or twist off).
- Tie the line to the spool with an arbor knot.
- Hold the line tight and wind with the handle.
- Fill to about 1/8 inch below the rim.
- Replace the cover and thread the line through the hole.
Essential Tips For Perfect Line Loading
Here are some insights that even experienced anglers sometimes forget:
Use The Right Amount Of Tension
If you wind the line too loosely, it will dig into the spool when you cast or reel in a fish. Too much tension can stretch or damage the line. Aim for firm, steady pressure—use a damp cloth to help.
Match Line To Reel Capacity
Never overfill or underfill your spool. Each reel has a specific capacity—follow the guide on the spool or the manual. Overfilled reels can jam, while underfilled ones won’t cast as far.
Replace Old Line
Fishing line loses strength over time. Replace mono every season, and check braid or fluoro for frays or damage. Sunlight, salt, and heat can weaken all types of line.
Remove Line Twist
If you see loops or twists while spooling, stop and let the line hang freely. This lets twists spin out before you continue.
Use A Line Spooling Tool
A line spooling station isn’t required, but it makes solo line loading much easier. These tools keep tension steady and prevent twist.
Wet The Knot
When tying knots, especially with fluorocarbon, wet the line first. This reduces heat and friction, making the knot stronger.
Common Mistakes And How To Avoid Them
Even experienced anglers make these errors:
Loading Line Backwards
If the line comes off the filler spool the wrong way, it causes twist. For spinning reels, the line should come off the filler spool in the same direction it goes onto the reel. Check both before winding.
Overfilling Or Underfilling
Too much line leads to tangles and wind knots. Too little hurts your casting. Always leave a small gap below the rim.
Not Checking For Line Twist
Ignoring twist leads to tangles on your first cast. Let the line hang loose and spin out twists if you notice them.
Skipping The Backing With Braid
Braided line slips on smooth spools. Always use a mono backing or tape to anchor the braid.
Ignoring Line Type Limits
Using line that’s too heavy or too thin for your reel can damage it or reduce performance. Check the reel’s recommended range.
Comparing Spinning And Baitcasting Line Loading
It’s easy to get confused by differences. Here’s a quick reference:
| Feature | Spinning Reel | Baitcasting Reel |
|---|---|---|
| Line Direction | Counterclockwise off filler spool | Straight off filler spool |
| Line Tension | Moderate, steady | High, very steady |
| Backlash Risk | Low | High |
| Knots Used | Arbor, clinch | Arbor, uni |
| Best For | Beginners, light lures | Experienced anglers, heavy lures |
Choosing The Best Line: Factors To Consider
Not all lines are created equal. Here’s how to pick the right one:
Target Species
- Small fish (trout, panfish): 2-8 lb test mono or fluoro.
- Bass, walleye: 8-20 lb test mono, fluoro, or braid.
- Saltwater/big fish: 20+ lb test braid or heavy mono.
Water Conditions
- Clear water: Fluorocarbon is nearly invisible.
- Muddy water: Monofilament or braid in hi-vis colors.
Casting Distance
- Long casts: Braid is thinner and flies farther.
- Short casts: Mono or fluoro work well.
Reel Size
- Check your reel for line capacity (e.g., “10 lb/150 yd”). Never exceed this—using thicker or heavier line than recommended can jam the spool.
Cost And Durability
- Monofilament is cheap, but stretches and wears out fast.
- Braid lasts longer, but costs more.
- Fluoro is expensive, but best for shy fish in clear water.
How Often Should You Change Your Line?
It depends on line type, use, and conditions. Here’s a quick guide:
| Line Type | Change Frequency | Notes |
|---|---|---|
| Monofilament | Every 6-12 months | UV and water degrade it quickly |
| Braid | Every 1-2 years | Check for frays; lasts longer if not damaged |
| Fluorocarbon | Every 12-18 months | Check for nicks, especially at the knot |
Preventing Line Twist And Tangles
A few practical steps can save hours of frustration:
- Always check the line’s direction before spooling.
- Keep even tension when loading and during fishing.
- Use a quality swivel when using lures that spin.
- Don’t overfill your reel.
- Stretch monofilament line by pulling it between your hands before spooling—it helps remove memory.
How To Store Fishing Line Properly
Unused line can go bad if not stored right:
- Keep in a cool, dark place: Sunlight and heat degrade line.
- Seal in a plastic bag: Keeps moisture out.
- Label the spool: Write the date and type of line, so you know when it’s time to replace.
Troubleshooting: Fixing Common Problems
Even with care, issues can happen. Here’s how to solve them:
Problem: Line Comes Off In Loops
- Cause: Overfilled spool or loose loading.
- Fix: Remove some line, respool with more tension.
Problem: Line Won’t Cast Far
- Cause: Underfilled spool, old or stiff line.
- Fix: Fill to 1/8 inch below rim, replace old line.
Problem: Line Twists After Loading
- Cause: Wrong direction off filler spool.
- Fix: Let the line hang loose, spin out twists, and reload.
Problem: Braid Slips On Spool
- Cause: No backing or tape.
- Fix: Add mono backing or tape before braid.
Problem: Knots Break Easily
- Cause: Dry knots, wrong knot type.
- Fix: Wet knots before tightening, use strong knots like the improved clinch.

Credit: www.stadedembour.com
Real-world Example: Loading A Spinning Reel For Bass Fishing
Imagine you’re setting up for bass fishing. Here’s what you’d do:
- Choose a 2500-size spinning reel with 10 lb monofilament.
- Attach the reel to the rod, open the bail, and thread the line through the guides.
- Tie an arbor knot to the spool.
- Close the bail, hold the line tight, and wind on 120 yards.
- Stop when the line is 1/8 inch from the rim.
- Tie on a hook or lure.
This setup works for most freshwater bass, and the process ensures fewer problems on the water.
Advanced Tip: Spooling Without Help
If you’re alone, place the filler spool in a bowl or bucket to keep it from rolling. Use a heavy book to create tension as the line passes underneath. Never let the line become slack.
When To Seek Expert Help
If your reel jams, the bail doesn’t close, or the line keeps twisting despite your efforts, visit a local tackle shop. Most offer spooling services and can check for reel or line defects.
For more information on reel types and line compatibility, check the official Pure Fishing Guide.
Frequently Asked Questions
How Much Line Should I Put On My Reel?
Fill the spool until the line is about 1/8 inch below the rim. Too much line causes tangles; too little reduces casting distance.
What’s The Best Knot For Attaching Line To The Spool?
The arbor knot is strong and simple for all reel types. For braided line, use a uni knot or add a monofilament backing first.
Can I Put Braided Line Directly On My Reel?
It’s not recommended for spinning or baitcasting reels, as braid can slip. Always use a monofilament backing or a strip of electrical tape to anchor the braid.
How Do I Avoid Line Twist When Loading?
Make sure the filler spool’s line comes off in the same direction as your reel takes it up. For spinning reels, this is usually counterclockwise. Use steady tension and let the line hang to remove twists.
How Often Should I Change My Fishing Line?
Monofilament should be changed every 6-12 months, fluorocarbon every 12-18 months, and braid can last 1-2 years. Replace sooner if you notice fraying, discoloration, or weakened strength.
Loading your fishing line the right way is more than just a basic skill—it’s a foundation for every good fishing experience. With careful attention to detail and these practical steps, you’ll spend more time catching fish and less time fighting your gear.
Whether you’re prepping for your first trip or refining your setup, the rewards are smooth casts, strong knots, and the confidence to tackle any water.