Setting up your fishing line can feel confusing, especially if you’re new to fishing. There are many types of fishing lines, knots, and gear options. But with the right steps, you can prepare your line confidently and avoid common mistakes that frustrate many beginners.
Whether you want to catch small freshwater fish or try saltwater fishing, knowing how to set up your line is the foundation for a successful trip. This guide will walk you through each part of the process—from choosing the best line and reel to tying your hook and adding weights—so you can enjoy fishing with less stress and more success.
Understanding Fishing Line Types
Choosing the right fishing line is the first important step. There are three main types of fishing lines: monofilament, fluorocarbon, and braided line. Each has its strengths and weaknesses. Understanding these will help you select the best line for your fishing style.
Monofilament
Monofilament is the most popular type for beginners. It is made from a single strand of nylon. It’s affordable, easy to tie knots with, and stretches under pressure, which helps prevent your line from breaking if a fish pulls hard.
Monofilament floats, making it good for surface fishing. However, it absorbs water over time and can weaken after long use.
Fluorocarbon
Fluorocarbon lines are almost invisible underwater, making them ideal for clear water and shy fish. They sink faster than monofilament, which is good for deep-water fishing. Fluorocarbon is more resistant to abrasion but is also stiffer and can be harder to tie knots with, especially for beginners.
Braided Line
Braided line is made by weaving several strands together. It has almost no stretch, so you can feel even the slightest bite. Braided lines are very strong for their size and last a long time. However, they are highly visible in water and can sometimes spook fish unless you add a leader made of mono or fluorocarbon.
Comparing Fishing Line Types
Here’s a quick comparison to help you choose the right line:
| Type | Strength | Visibility | Stretch | Best For |
|---|---|---|---|---|
| Monofilament | Medium | Medium | High | Beginners, Surface fishing |
| Fluorocarbon | High | Low (Invisible) | Low | Clear water, Leaders |
| Braided | Very High | High | Very Low | Heavy cover, Deep water |
Non-obvious Insight: Many beginners choose the strongest line they can find. In reality, too strong a line can reduce your chances of catching fish, as it may be more visible and less sensitive to light bites.
Selecting The Right Fishing Reel
Your fishing reel holds the line and helps you cast and retrieve it. There are three main types: spinning reels, baitcasting reels, and spincast reels.
Spinning Reels
Spinning reels are great for beginners. They are easy to use and work well for most types of fishing. The reel hangs below the rod, and you open the bail to cast. Spinning reels are good for light lines and smaller lures.
Baitcasting Reels
Baitcasting reels offer more control and power but require practice. They are used for heavier lines and lures. However, they can cause “backlash” (tangled line) if not handled properly.
Spincast Reels
Spincast reels are the simplest and most beginner-friendly. You push a button to cast. These reels are less powerful but perfect for children or those just starting out.
Reel And Line Compatibility
Not every reel fits every type of line. Here’s a guide to help you match them correctly:
| Reel Type | Best Line Type | Recommended Line Strength |
|---|---|---|
| Spinning | Monofilament, Braided | 2-12 lb test |
| Baitcasting | Braided, Fluorocarbon | 10-50 lb test |
| Spincast | Monofilament | 2-10 lb test |
Non-obvious Insight: Using the wrong line weight for your reel can damage your gear and make casting difficult. Always check the manufacturer’s recommendations printed on the reel or rod.
Credit: blog.fullingmill.com
Preparing Your Fishing Rod
Before you add your line, check your rod. Make sure it is clean and free of damage. Thread the line through the guides (the small rings) from the bottom (near the reel seat) to the tip. This is an easy step, but skipping it or threading incorrectly can cause tangles and reduce casting distance.
Rod Power And Action
Rod power (how much force it takes to bend) and action (where the rod bends) affect your fishing experience. Lighter rods are better for small fish and light lines, while heavier rods work for bigger fish and strong lines.
Spooling Your Reel With Line
Now it’s time to put the line on your reel. This process is called spooling. If you do this wrong, you can get tangles, knots, or loose line.
How To Spool A Spinning Reel
- Attach your reel to the rod.
- Open the bail arm (the wire loop on the reel).
- Tie the line to the spool using an arbor knot (simple and strong).
- Close the bail.
- Hold the line gently between your fingers to keep tension.
- Slowly turn the reel handle and wind the line onto the spool. Keep the line flat and tight.
- Stop when the line is about 1/8 inch below the edge of the spool.
How To Spool A Baitcasting Reel
- Attach the reel to the rod.
- Thread the line through the guides.
- Tie the line to the spool with an arbor knot.
- Wind the line slowly, keeping tension.
- Fill the spool until it’s about 1/8 inch from full.
Tips For Spooling Line
- Avoid overfilling the spool; this causes tangles.
- Don’t underfill; this reduces casting distance.
- Always keep the line tight while spooling to prevent loose coils.
Choosing And Attaching Leaders
A leader is a short piece of line between your main line and the hook or lure. Leaders are often stronger or less visible than your main line. They help prevent fish from seeing the line or biting through it.
Types Of Leaders
- Monofilament Leaders: Good for general use and shock absorption.
- Fluorocarbon Leaders: Nearly invisible, great for clear water.
- Wire Leaders: Used for fish with sharp teeth (like pike).
How To Attach A Leader
- Cut a leader about 18–36 inches long.
- Use a double uni knot or a swivel to connect the leader to your main line.
- Attach your hook or lure to the end of the leader.
Tying Strong And Reliable Knots
Tying the right knot is critical. The wrong knot can slip or break, causing you to lose fish. Here are three essential knots every angler should know:
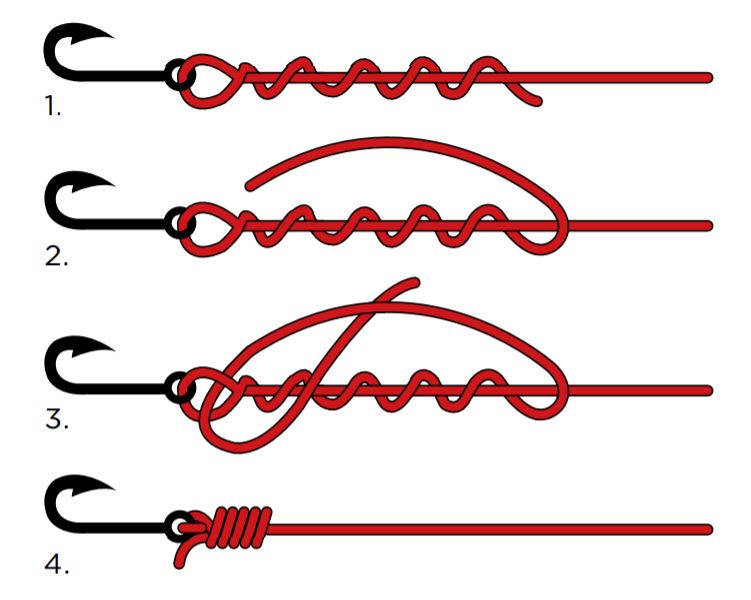
Improved Clinch Knot
This is one of the most popular fishing knots for tying a hook or lure to your line.
- Thread the line through the eye of the hook.
- Wrap the tag end around the standing line 5–7 times.
- Pass the tag end through the small loop near the hook.
- Pass it back through the big loop you just made.
- Moisten the knot and pull tight.
Palomar Knot
Very strong and simple, works well with braided line.
- Double about 6 inches of line and pass it through the eye of the hook.
- Tie a loose overhand knot with the doubled line.
- Pass the hook through the loop.
- Moisten and pull both ends to tighten.
Uni Knot
Great for tying line to hooks, lures, or even joining two lines.
- Run the line through the hook and double it back.
- Make a loop with the tag end.
- Wrap the tag end around both the main line and itself 5–6 times.
- Moisten and tighten the knot by pulling on the tag end.
Practical Tip: Always moisten your knot before tightening. This reduces friction and helps the knot seat properly, making it less likely to break.

Credit: www.evermorecruises.com
Adding Weights And Bobbers
Weights (also called sinkers) help your bait sink to the desired depth. Bobbers (or floats) keep your bait off the bottom and show when a fish bites.
Types Of Weights
- Split Shot: Small, easy to pinch onto the line for light fishing.
- Egg Sinkers: Good for bottom fishing; slide on the line before the hook.
- Bank Sinkers: Heavier, used in strong currents.
How To Add Weights
- Decide where you want your bait (near the surface, mid-water, or bottom).
- Pinch a split shot onto the line about 6–12 inches above the hook for general fishing.
- For deeper fishing, slide an egg sinker onto the line before tying the hook.
Types Of Bobbers
- Round Bobbers: Easy to attach and see from a distance.
- Slip Bobbers: Slide up and down the line, letting you fish at any depth.
How To Attach A Bobber
- Pinch the top and bottom of the bobber to release the hooks.
- Clip the line under the hooks.
- Adjust the bobber’s position to set the fishing depth.
Non-obvious Insight: Don’t use too large a bobber. Big bobbers create resistance, making it harder for fish to pull your bait down. Smaller is usually better for most freshwater fish.
Attaching Hooks, Lures, Or Bait
Your choice of hook, lure, or bait depends on the fish you want to catch.
Hooks
- Size: For small fish, use smaller hooks (size 8–12). For bigger fish, use larger hooks (size 2–6).
- Shape: Common shapes are J-hooks and circle hooks.
Lures
Artificial lures come in many styles—spinners, jigs, crankbaits, and soft plastics. Match the size and color to the fish and water conditions.
Bait
Live bait like worms, minnows, or insects is very effective. For some species, pieces of corn, bread, or dough balls also work.
How To Attach
- Tie your hook or lure using a strong knot (see above).
- For live bait, thread the bait onto the hook so it stays secure but looks natural.
- For lures, make sure any split rings or snaps are closed tightly.
Setting Up For Different Fishing Styles
The way you set up your line can change depending on where and how you fish. Here’s how to adjust your rig for popular styles:
Freshwater Fishing (lakes, Ponds, Rivers)
- Use monofilament or fluorocarbon line (4–12 lb test).
- Add a small split shot and round bobber for panfish or trout.
- Use smaller hooks and live bait or small lures.
Saltwater Fishing (ocean, Bays)
- Use braided line with a fluorocarbon leader (20–50 lb test).
- Add heavier weights to reach deeper water.
- Use larger hooks and bait for species like snapper or sea bass.
Fly Fishing
- Uses a special fly line, not covered in this article, but setup involves attaching a tapered leader to the fly line and a small fly at the end.
Ice Fishing
- Use short rods, light line (2–6 lb test), small hooks, and live bait or small jigs.
Checking And Maintaining Your Fishing Line
A well-maintained line is key to avoiding lost fish and tangled messes.
Before Each Trip
- Run your fingers along the line to feel for nicks or rough spots.
- Replace the line if it feels rough, frayed, or old.
- Store your reels out of direct sunlight—UV rays weaken line over time.
After Fishing
- Rinse saltwater reels and lines with fresh water to remove salt.
- Let the line dry before storing to prevent mold and rot.
Practical Tip: Change your line at least once a season if you fish often. For casual anglers, once a year is usually enough.

Credit: fishingbooker.com
Common Mistakes To Avoid
Even experienced anglers make setup mistakes. Here are some to watch for:
- Overfilling the reel spool: Causes tangles and “bird’s nests.”
- Underfilling the spool: Reduces casting distance and makes it harder to retrieve fish.
- Using the wrong knot: Weak knots lead to lost fish.
- Mismatched line and rod/reel: Can damage your gear or make fishing harder.
- Ignoring line twist: Twisted line creates tangles and knots.
- Not checking line condition: Old or damaged line breaks easily.
Example: Step-by-step Basic Freshwater Setup
Let’s put it all together with a practical example for lake fishing:
- Choose a spinning reel and rod rated for 6–10 lb test line.
- Select monofilament line (8 lb test).
- Attach the reel to the rod.
- Thread the line through the rod guides, starting at the tip.
- Open the bail and tie the line to the spool with an arbor knot.
- Spool the line onto the reel, keeping tension, until it’s 1/8 inch from the top.
- Cut a 24-inch fluorocarbon leader and attach it to the main line with a double uni knot.
- Tie a size 6 hook to the end of the leader using an improved clinch knot.
- Pinch a split shot about 8 inches above the hook.
- Attach a round bobber 2 feet above the hook.
- Bait the hook with a worm or small minnow.
- Cast the line